Sunday, December 23, 2012

Forgot password when locked iPad?

How to solve problem because locked ipad but forget the password. The simple version check under "Settings> General> Passcode Lock" and by enabling "Simple code". A normal code, for example, consists of a combination of letters and numbers is, of course, much safer. But while it may happen that you lock yourself out if you forget the password or it is no longer possible to enter it correctly. What is there to do to get back to the data and get hold the iPad to unlock again?
Methods that do not work

forgot password when lock ipad

Forget Password Ipad?

The Internet is claimed in various places, it is possible to skip the lock screen in the proper password. Most of these tips work but unfortunately not. In previous iOS versions, there was a software problem, it - but only on iPhone - made possible via an emergency fool the lock. The method is of course irrelevant to the iPad. Solutions that propose a deletion of the code on additional tools on the computer or an overwrite the password bring, also without success.
The method that works

Normally restoring the iPad would be the factory settings via iTunes the obvious idea. The works in this case not because iTunes before restoring requires the passcode. Fortunately there is still a way to bypass the code request. To do this, follow these steps:
Even in the off state, it is possible to sync the iPad with your computer. This you should do first, to create a complete backup of all the data in iTunes. Then you put the still connected to the computer iPad in the maintenance state, called DFU mode. Simply launch the new iPad (holding down the power button in the off state and pressing the "off" slider and back on). Hold down the power button on startup and the Home button at the same time ten seconds. You can let go of the power button as soon as the Apple logo appears, hold but still holding the home button. iTunes then signals that an iPad has been detected in recovery mode and this will be reset for use with iTunes to the factory settings must.

Read also
how to use i message on apple device
apple news update

"OK" to restart after a further warning that complete resetting. Here, the current version of iOS is downloaded and installed on the iPad. Thereafter, the device follows a new iPad so language, enter the sim pin (the 3G model) and connect to the Wi-Fi network. In the final configuration screen, select "Restore from iTunes backup" and tap "Next". After re-connecting to iTunes, choose the most recently created backup and press "Continue". Then all the data will be copied back, which can take several minutes. After completing everything is accessible without a password. After another reboot the iPad synced back all apps.
While it would be nice if there would be a simpler, especially less time consuming way as maintenance mode and complete reset, but then one has as iPad owners the peace of mind that the data are indeed protected pretty sure, but presented on the method Emergency are still accessible via detours.

I hope you can solve the problrm becaue you forget password when lock ipad. then you can know how to find password

Saturday, December 22, 2012

How To Create wifi Wifi Hotspot With Android Phone

Maybe all of you often see some one use their android phone as their hotspot. So On this post i will share how to create hotspot with android phone. Smartphones are available for communication in its purest form. These devices are still phones, but they can be much more. There hide some treats that make your mobile phone can be used universally in the network settings. Actually create hotspot is not too difficult.

Create Hotspot With Android

Certainly, you expect now that you can go with your mobile phone via an existing Wi-Fi network on the Internet. So, you're also right. But that alone is now again so boring that we us not want to keep up.
Well, this little marvel can act as a modem. It is irrelevant whether you use it as a mobile access point or turn it into a modem via USB.
Your Smartphone as a wireless modem works as a mobile access point. Up to five devices can access it. If it is connected as a modem via USB to the PC, we are talking about "Tethering". This is only useful if you can access a fast data network (E.g. UMTS). Everything else is due to very low speeds at best as an emergency issue.

1) Network settings

Taking all necessary settings "wireless and network" before. The list is very long and the imageable area is not sufficient for all entries.
create hotspot with android phone

2) Wireless close?

But in any case "delete data and cache region" as well as "Wipe Dalvik Cache" hooks and tap OK. (Warning: this will delete your apps and settings.) Existing images on the device, music and videos remain but get!)
create-wifi-with-android

3) Hurray, I'm in it!

If you want to log into an existing network, give, if required, a network ID (called also SSID), edit the security settings and password.

4) Cell phone as a Wi-Fi router

Tip on "Mobile access point", to use your Smartphone as a wireless modem. Once set up, you can set up your mobile phone as a wireless network connection from your PC.


5) Security is

To prevent unauthorized access, it is advisable to secure this access point to the outside. "WPA2-PSK" choose to do this, see "Security" the entry and leg set a password.

6) We build a modem

Your mobile phone via USB is connected to the PC, tap "Tethering" and there to activate this option. Now, your Smartphone functions as a modem with which you can make the Internet unsafe.

i hope after you read the tutorial above you can make your own wifi connection or hotspot with your android phone.

Samsung Galaxy S3: Rolls out Android 4.1.2 including premium suite

And off you go: the first German Galaxy S3 supplied by Samsung in these minutes with the update to Android 4.1.2 - smartphones - the so-called Premium Suite, the number of the Galaxy is included note 2 well-known software features on the 4, 8 ZOLLER brings, including the multi window functionality is great.

As colleague Lars reports by allaboutsamsung and amongst our Swiss readers has confirmed Patrick with a screenshot, the firmware update on Android version 4.1.2 to the hour reaches the first ungebrandeten German and German-speaking Samsung Galaxy S3. I myself get even the hint that I should wait me there rolled out the update in the order of the user requests on my Vodafone branded device when attempting to update what is - means exactly that (and should be rolled out the update for Vodafone unit not already a few days ago?). But times very optimistic, we assume that all users who will get only this message instead of the update, one or two are happy days in the next.

S3-Premium-Suite-Update


In addition to the newer version of Android that brings an rotating launcher and fold-out notifications , worth regularly tap the update button under "Settings - phone - software update" because of Samsung's own Premium suite, which will be installed. That brings many of the Galaxy note 2 known comfort features - we reported. above all the multi window feature, with the parallel on the present screen two apps let.

Overall, the update is also scarce 130 MB in size, while staying in a wireless network, we recommend the download.

Read also
How to make iphone ringtones

Already what has come with you? And how to make the new features? Could you find else changes? Our comments section is pleased about details and first reviews.

Tuesday, December 18, 2012

Tutorial use link 2sd

If you have an Android device, sooner or later you'll be tempted to give it the ROOT permissions and maybe install some custom ROM or some application to manage your device. Among the many applications that we can come in handy, one of the best is absolutely link2SD and now we're going to see why.
link2sd tutorial

Link2SD is useful in cases where your smartphone has a very low internal memory, because thanks to it we can still install different applications and move them to your SD card. Just on this point builds the strength of schedule, in fact not only allows link2SD to move apps to SD as normally happens with all programs of this type, but provides links. What does this mean? Means the program or game concerned will be fully transferred on SD and maintained a link on the phone memory that will believe the app to your smartphone are still in main memory.

To do this we will need a microSD to partition (it is OK that you already have on your phone, but if you remember to make a backup of the content before proceeding), and of course link2SD. We have microSD into two partitions, one FAT32 (I'm already formatted all so) where they photos, videos, various data and links to other app; and EXT2 where will the various app with all their weight. I recommend partitioning the microSD more or less so depending on their capacity:

1 GB-> 512 mb EXT2
2 GB-> 1 GB EXT2
4 GB-1.5 GB EXT2 >
8 GB-> 2 GB EXT2
16 GB-> 4 GB EXT2
32 GB-> 8 GB EXT2
Obviously the remaining space must be formatted in FAT32. Remember that both partitions must be set as PRIMARY.

How To configure Link2SD

Now lets start to setting link2sd to linking the apps to sd card. When the microSD is ready insert and start link2SD, you will be prompted to choose the file system of the second partition.

configure-link2sd


As you can see in the list are EXT2, EXT3, EXT4, FAT16 and FAT32, but personally I managed to get it going only with EXT2, if you want to try with the other file systems do well and maybe let us know your results in the comments.

link-apps-to-sdcard


Once you have chosen the file system will be installed on the partition script, close the app and restart your device. Now everything is ready for use. Re-open link2SD you will find yourself before the list of installed applications, click on it and you will open a page with different voices, including "create shortcut", that we're going to press. Check everything you can and press ok, in no time your app will be linked and like magic you will find much more space on the phone's internal memory.

tutoriafl link2sd


Keep it up for any app that you want to link to, knowing that in case of necessity you can restore everything as above by pressing on the button "Remove link".

The preferences you can select "Autolink" that almost funzionà with all applications, allowing you to connect your applications automatically after their installation.

As mentioned at the beginning to use this feature of link2SD you need to have root rights. The application is available for free on Google Play Store. ok thats for tutorial install link2sd
source : how to use link2sd

Sunday, December 16, 2012

How To Install ICS On Nexus One

Let's see step by step how to install a rom (almost) stable Ice Cream Sandwich on our Nexus One. The Google will not be updated to the official Android 4.0 (unless I do not perturbed by this petition ), so it's up to us to roll up our sleeves and hacking the device.

The rom that we are going to install is the Evervolv (Texas) Ice Cream Sandwich N1 AOSP 4.0.3, which you can read detailed info on xda forum .

Guide To Install Ice Cream Sandwich

First backuppate anything important to you on the phone! Remember to save contacts, SMS, important data, application profiles and anything else to serve you. The SD card will not be formatted, but the internal memory of the phone.
install-ics-on-nexus-one

Let's start with the basics:

INSTALL ANDROID SDK AND ADB

1) Download the latest version of the 'Android SDK from Google
Android SDK (select the exe)

2) Once downloaded, execute the file and select installation path as c: android-sdk
3) Open SDK Manager and install the following packages:
Android SDK Tools
Android SDK Platform Tools
Google USB Driver Package, Revision (the latest available)
4) We follow the instructions on the screen until we have all 3 packages installed on your PC.
5) On the phone we click Settings> Applications> Development and activate USB Debugging.

6) We connect the Nexus One via USB cable. Driver will be installed automatically by Windows, we are waiting for.

7) Well, let's start with the commands: open the Windows command line (Start> Search> cmd):

Let's move to c: android-sdkplatform-tools using the cd command ("cd .." to go back one folder, "cd foldername" to open a folder).

8) type:
[Box_light] adb devices [/ box_light]
And press enter, if a written standards opens with a serial number then the phone is riconoisciuto, very good! If, however, you should not see any device you try to reinstall the drivers, I used the software PDA Net, which has a different purpose, but very well reinstall the drivers for Android smartphones: http://junefabrics.com/iphone/index.php

Now we have the prerequisites.

Moving on to the next step.

BLACKROSE HBOOT
1) Download and unpack BlackRose in a folder on your pc: here .

2) We turn on the phone and connect via usb (always with usb debugging on)

3) We download the rom from here -> Download rom and put it on the SD card of Nexus One

4) We start the app BlackRose following instructions: to run the control Fast Boot and ADB, the cell will restart, do not touch anything until it appears on the PC that BlackRose has been successfully installed (we can read up on the Nexus-HBOOT 7.35. 5017).
Close BlackRose on the PC and click Fast boot on your phone.

5) You will see the screen BlackRose Fast-boot usb, for the moment we leave the phone as well.
install-nexus-one-ice-cream-sandwich

6) We download files from the PC to the partition of the phone here .

7) Put it in the folder C: android-tools-sdkplatform

8) re-open the cmd: go to the folder C: android-sdkplatform-tools using the commands in cmd ("cd .." to go back, "cd foldername" to move between folders).
Type:
[Box_light]
fastboot flash hboot hboot_220-16-200.nb0
fastboot reboot-bootloader
[/ Box_light]
At this point the phone will restart!

INSTALL ANDROID 4.0 AND WIPEARE
9) Let's go back in recovery mode,
10) We'll do a full wipe (fundamental) and install the rom previously downloaded by selecting the option select zip from sd of ClockworkMod Recovery.
11) Reboot and wait about 10 minutes for the first boot of the new flaming operating system.


Finished, you have successfully install Ice Cream Sandwich on the Nexus One. Installed the rom is very stable and works almost everything except hardware acceleration. Being a beta, however, you may experience occasional bug or system errors, then this guide is NOT recommended for daily use to those seeking first the stability and reliability from their smartphone. For the geeks instead I recommend you try it, that it is worth!

REMOVE BLACKROSE.
In case of problems you can remove Blackrose hboot by starting the phone normally and running the tool blackrose. At this point, simply select unistall and enter a password at least 6 characters. At this point, the phone will be returned as before. Thanks to fede77

Thursday, December 13, 2012

Guide To Root Galaxt Nexus With Android 4.1 Jelly Bean

If you have already had the opportunity to try out the new Android Jelly Bean 4.1 for Galaxy Nexus, through rom released a few days ago, then you have also tried to unlock the bootloader (fastboot oem unlock with the usual) and maybe even to make the root of the device . With the new Android Jelly Bean do not seem to work most of the traditional methods to obtain root permissions: so here is a simple guide to perform the root of the Galaxy Nexus with Android 4.1, tested procedure correctly on i9250 models, namely the European GSM variant .

HELP - ROOT ANDROID 4.1 GALAXY NEXUS

  1. Download your recovery preferred, for example the excellent ClockworkMod Touch .
  2. Download JB-SuperSU.zip from one of these mirrors:
    Mirror # 1
  3. Copy the file to the root of JB-SuperSU.zip SD Card Galaxy Nexus using the browser or simply with the command adb push JB-SuperSU.zip / sdcard /
  4. Restart booloader via adb with the following command:
    adb reboot bootloader

Or Second Root Method

  1. to the terminal is off, hold down the volume keys and press and hold the power button until it enters the recovery.
  2. Install the custom recovery using the command:
  3. fastboot flash recovery recovery-clockwork-5.8.0.2-touch-maguro.img (or the name of your recovery you downloaded in step 1)
  4. To ensure that the recovery remains permanently installed you must rename the file / system / recovery-from-boot.p after gaining root permissions - you have to remount / system rw permissions
  5. Moved from the bootloader menu Recovery and press the button to start
  6. Choose "install zip from SD-Card", and installs the JB-SuperSU.zip
  7. Restart - you should see the icon uperSU
  8. Try it with any program that requires root, such as Root Check or Titanium Backup
  9. End We will have done well to root the Galaxy Nexus
source : root galaxy nexus on android 4.1

Tuesday, December 11, 2012

Complete Instruction Root HTC One X

see complete tutorial for how to root htc one x here. If you plan to buy the new smartphone of the phone HTC, you now have a reason to rush the purchase. In fact, today's guide we'll show you how easy it is to make the root of this model simply by following the steps immediate and clear. Try it, read it and see.
how to root htc one x

Requirements

  • HTC One X
  • Phone battery at least 60%
  • Full backup of all the data, to avoid unnecessary losses
  • Enable USB Debugging (Menu-Settings-Applications-Development-USB Debugging)
  • Usb Cable
  • Computer

Tutorial Root HTC One X

  1. First download r1-endeavor-superboot.zip from here, on your PC.
  2. Extract the zip file into a new folder and you will find yourself in front of 12 files
  3. Turn off your phone.
  4. Go into bootloader mode. Press and hold the Volume Up and Power button, release the Volume Down key when you see the bootloader screen.
  5. Connect your phone to your PC using a USB cable
  6. Choose the process of rooting depending on your type of operating system
  • Windows OS: start this file install-Superboot-windows.bat
  • Linux OS: launch terminal and indirizzatelo to the folder where I have 12 rows. Then you run the following command: chmod + x install-Superboot-linux.sh.:. / Install-Superboot-linux.sh
  • Mac OS: launch terminal and indirizzatelo to the folder where I have 12 rows. Then you run the following command: chmod + x install-Superboot-mac.sh And then this command:. / Install-Superboot-mac.sh

Your phone will restart automatically. Open the app and try extracted SUPERUSER if you see it then your phone will finally be equipped with root. We expect that this process on Root HTC One X has taken place in the best way and wish you a good continuation of Androider.it, the
next and interesting

source : root htc one x with hasoon toolkit

Monday, December 3, 2012

How To Install Windows 8 on Mac

For Mac owners, here is a very useful guide that allows you to install Windows 8 on your Mac
The guide is very simple and clear and will help you for the purpose like i mentioned before

I hope that with this guide you will be able to install Windows 8 on Mac and, at the same time, you can keep installed Mac OS X. In this way you will have 2 operating systems, choosing which one to use power of your computer.

If you want to install Windows on an Apple computer without affecting in any way the operation of the OS natively, you will not have to do is follow this guide.


How To Install Windows 8 on Mac


Read First
  • performed all at your own risk
  • before do this I recommend you do a full backup of your data
To get started you need to download the ISO of Windows 8, which is the disk image that contains all the files required to run the installation procedure.

Once you have the ISO image of Windows 8, then burn it to DVD.

To install Windows 8 on Mac just use the 'Boot Camp Assistant, an application enabled by default on all operating systems newer Macs that just serves to bring the Microsoft OS on Apple computers.

Once in front of the screen, click Continue leaving tick all the boxes as shown.
install windows 8 on mac

If you want to download the software support for Windows 8 on DVD (these drivers to work properly, all devices), select the "Burn a copy to CD or DVD", otherwise select "Save a copy on an external drive "making sure that the media you use is formatted with a FAT file system.

The application will now an automated process and at the end you have the DVD or memory stick to install all the drivers required for Windows to run properly on an Apple computer.


install windows os on apple

At this point, before proceeding with the installation of Windows 8, Boot Camp Assistant will ask you to create a partition to host the new operating system.

Follow the wizard to perform the task automatically. At the end everything will be ready to install Windows 8 on a Mac

Now insert the disc into your optical drive with Windows 8 on your Mac and finish the operation by clicking on the "Install" button. Application will automatically restart your computer and start the Windows installation.

There will be nothing but continue with the setup wizard.

The only trick is to follow the selection of the Windows partition: Make sure that choice is the same that was created with the Boot Camp Assistant.

Once Windows is installed, you have two operating systems on your Mac to use to select which one to boot when the system, simply press and hold the 'alt' on startup. Remember, when you go to boot Windows, install the drivers by running the executable you created earlier. Without drivers, Windows will malfunction.

As you can see, the steps to install Windows 8 on a Mac is very easy and quick. And most importantly, it is almost completely automatic.

Try it and let me know if you can get in 'installation of Windows 8 on a Mac

Sunday, November 11, 2012

Apple Release Mountain Lion GM Seed for Developers

Today, Apple released the OS X version of the Mountain Lion Golden Master Seed for all registered developers in the Mac Developer Program. Just like previous releases, Apple released OS X definitely pre-release version of the Golden Master Seed which can be similar to the final version of OS X is. OS X GM Seed can only be obtained with a code on the Apple Developer site and redeemed (redeem) directly into the Mac App Store for download. For those who have what it mengenail Golden Master, is a version that's ready for the consumer.

Apple first introduced the OS X Mountain Lion in early 2012 and discussed it more clear in the event Worldwide Developers Conference 2012 at the Moscone West in June that lau. Mountain Lion OS X is scheduled to be released in July at a price of $ 19.99. Just like Lion, Mountain Lion OS X can only be purchased and downloaded from the Mac App Store only. Mountain Lion also can be upgraded directly from the OS X Lion and even Snow Leopard. Therefore, be prepared for the present Mountain Lion this month.

Saturday, November 10, 2012

What's New in Mountain Lion OS X At WWDC 2012

At WWDC 2012 that held earlier today, Apple announced a lot of great new features to make people amazed. Surely the Mountain Lion OS X announcement, disclosed the new features that have not been known, the following is the summary.

iCloud everywhere

iCloud on Mountain Lion is now integrated with the system. When we log into OS X with Apple ID, OS X will sync and we stay put. If you've setup email on the iPhone, we can directly use the email account in OS X without the need to bother anymore setup again. Good news for fans of iWork, iCloud will be integrated with iWorks (Pages, Numbers and Keynote). We can work on the Mac and then continue on the iPad without the need to plug in the cable again.

Reminder Notes and Messages

We've been viewing Messages beta for OS X Lion and wrote the tutorial on how its use . The third application will be available at the Mountain Lion OS X, and integrated directly with iCloud, all data will be tersingkronisasikan through iCloud, asiknya ....

Notification Center


Notification center is a new feature in OS X Lion Mountain from iOS. Previously been reviewed, there are some new things revealed by Apple. Notification Center has a Do not Disturb mode, if active, will not receive notification.

Dictation in OS X

Dictation is available on the iPad, then we can enjoy this feature at Mountain Lion OS X. With Dictation we can dictate OS X to write down what we say. Surely now Indonesian yet supported.

Power Nap

One more innovation from Apple. We often meninggallkan laptop in a state of sleep, right? In the Mountain Lion, even while sleep, OS X will work renewal. Power Nap will take reforms such as email, and data from the iCloud. Even when connected to a power source, OS X will perform backups to Time Machine. I am very happy with this one feature.


Sharing via Twitter and Facebook

At the release of Mountain Lion OS X before, sharing only Twitter. Apple integrates Facebook into the system, we can make any sharing to Facebook and Twitter. Who says Apple hates Facebook?
sharing via twitter and facebook

Besides sharing to Facebook, Apple also integrates with Facebook contacts. This means that if our friend is in contact has the same email to Facebook, Address Book will take other data to complement existing data on Facebook, something like what Cobook.app do .

AirPlay Mirroring to Apple TV

If you have an Apple TV, you can mirroring what you see on your Mac to your big TV screen. Nothing special about this feature, besides the Apple TV can not be used for an iTunes account Indonesia, unless you have a broadband connection and a USA iTunes account.

Game Center, Hooray!

sharing via twitter and facebook

The darkness day of Mac that does not have games, now already gone ! With Game Center we can compete with our friends who play the same game on the iPhone. Achievment every game will syncronize through iCloud, as well as a list of games and friends.


New features in Safari


Safari has a display such as chrome, no further search input, Address Bar and Search Input united.
tab view on safari browser

Apple adds features cosmetic Tab View, where we can see that there are tabs with Tabs in iOS-style display, of course, with a large preview.

Ever wanted to open a page on the website that the iPad to OS X? Well, iCloud perform magic again. Through iCloud, all Safari Tabs will disingkronisasi, can continue to read a web page from iOS into OS X or sebalikanya. This feature can also be used as a tool for parents to monitor what kids do when browsing on the iPad.
No less important, we can share a page via Safari to Twitter, Facebook, Email, AirDrop or Messages. This sharing feature was incredible and I think Apple is doing it right! Because now if you want to share sesuati go through a lot of stages.

New Dock Design

Design Dock now old, since Leopard. Fortunately the Dock Mountain Lion in makeovers, become more subtle and modest, not so glossy as it is now.

Should Upgrade to the Mountain Lion!

Why should upgrade? First, it costs only $ 20, cheaper than the Lion OS X. Secondly, you can upgrade directly from Snow Leopard, I need to upgrade to OS X Lion first. Third, most importantly, all of the above features! The integration between OS X and iOS make OS X becomes more powerful.

Mountain Lion OS X will be available in the App Store in July, the date is still uncertain. To be sure, pantengin continue MakeMac to release information and updates about the Mountain Lion.

Apple Ask The Developers To Register Their Apps To Welcome Mountain Lion OS

Not long after Apple released the OS X version of the Mountain Lion GM (Golden Master), this time the technology giants urged the developers immediately lodged its application for OS X Lion Mountain. The call is sent directly to the developers in the form of emails, just like when Apple urges developers to immediately sign up for the Gatekeeper .
developers have to submit apps for mountain lion os


Make sure your apps take advantage of the great new features in OS X Lion Mountain when the world's most advanced operating system ships to millions of customers worldwide. Download OS X Mountain Lion GM seed and Xcode 4.4 GM seed, now available on the Mac Dev Center. Build your apps with these latest seeds, then test and submit for review.

You can also submit iOS apps that take advantage of the new cross-platform Game Center Groups, so they'll be available when OS X Mountain Lion ships.
Source : cult of mac

As written in the brochure of email Apple, Apple urges developers to download the GM version of the OS X Mountain Lion and Xcode 4.4 out Mac Dev Center page. Apple also advised developers to quickly create applications using the new version of this. In addition, Apple also told the iOS application developers to take advantage through the Cross-Platform at Game Center Groups in Mountain Lion.

Mountain Lion OS X will be released at a price of $ 19.99 on the Mac App Store, it's cheaper to $ 10 if we tilis when Mac OS X Lion release last year.

At WWDC 2012 yesterday submitted if the Mountain Lion will be released in July and now, the GM version has been released to developers. So, it can be concluded if in the not distant future, OS X Lion Mountain will present to the public. You interested? Please be prepared with a $ 19.99 on your pocket

Thursday, November 8, 2012

How to Move Backup Application to Other Computers

How do I move the backup application to another computer? Have you ever encountered this problem? Illustrations or examples of cases that may occur are as follows: you have iTunes installed laptop where many applications have been downloaded for the iPhone / iPad / iPod. Synchronization using a laptop you've always done it. But lately 3G internet connection in your home so that impaired activity of downloading the latest applications from iTunes to move to the computer where you work. Of course, to download the new application you need to install the iTunes on the computer in your office and allow the computer to access your iTunes account.

Keep in mind that Apple only allows a maximum of 4 different computers used to access the same iTunes account. Well, once you've downloaded the new application can not directly connect your iPhone / iPad / iPod at the office computer. Why is that? Remember that the information on applications that have been installed into your gadget stored on your laptop. Your computer in the office do not have this information so that when you synchronize using the office computer all applications will be automatically deleted by iTunes. To avoid it then you can move the backup application to another computer (laptop) so that applications that have been installed are not removed automatically.

Important Things to Know Before Moving to Another Computer Backup Applications


Okay, after understanding about the illustrations or examples of cases that I have described above, the way we do to avoid automatic deletion when the sync is to move the backup application to another computer (laptop in this case). After moving the application you want to install the file to the computer that is used to synchronize the next step is to synchronize the living. Well before forgetfulness there is one thing you need to know before moving the application file to be installed is the place where iTunes put the downloaded files on your computer's iTunes Store.

Place Files Applications in Windows Vista / 7

iTunes will put the downloaded files from the iTunes Store on the folder "Libraries \ Music \ iTunes \ iTunes Media \ Mobile Applications \".


Place Files Applications in Windows XP

iTunes put all file downloads from the iTunes Store on the folder "C: \ Documents and Settings \ USERNAME \ My Documents \ My Music \ iTunes \ iTunes Media \ Mobile Applications \". Where USERNAME is the name of your users to Windows XP.

Tutorial Backup Application to Other Computers

The steps that must be done to move the application file is as follows:

  1. Open the folder where the application where you download applications from the iTunes Store (see address given above folder, adjust the operating system of your computer), select the application file and move it to a flash drive or external hard drive you.
     choose the apps to backup
  2. Move applications from a flash drive / external hard drive to the computer where you synchronize. Place the application file folder at the address corresponding to the computer's operating system.move apps to flash disk 
  3. Run iTunes and do not close the window where you put your application files are copied in the step above. Find the file you want to install, left-click once on the file name. While holding the left mouse button, drag and move it into your iTunes Library on.drag apps to itunes 
  4. The files will be installed should now exist in your iTunes libraries. Try checking to see Apps in the iTunes menu.
    transfer backup apps to other laptop 
  5. The final step is of course to synchronize the first select the application you want to install.sync apps

well it is quite easy to do right?? From This tutorial you don't need to be confused when downloading a new application on your computer that is not used as a synchronization. With the tips move backup to another computer application as described above, then the installation of the downloaded file is a simple thing to do

Tuesday, November 6, 2012

Iphone User Loyalty Drops In Europe And U.S.

Apple's latest iPhone model is very much in demand. This is confirmed not only by the long queues in front of Apple's retail stores, but also the still insufficient availability of smartphones , so the consumer demand can be met. Above all Apple customers are opting for the iPhone 5, who have already used an Apple smartphone. But the loyalty of iPhone owners is reduced in comparison to previous years.

This could determine the market researcher Strategy Analytics. According to the study on the subject opt representing 75 percent of all owners of an iPhone for the purchase of a new smartphone from Apple. The previous year, Strategy Analytics reported nor a value of 88 percent. Until the launch of the iPhone 4S is always increased customer loyalty. But now she fell for the first time since Apple's popular smartphone series on the market offers.

Customer loyalty is still incredibly high

Although Apple has according to the results of the study suggest some feathers. However, the values ​​of the study, the market researchers are still very high when compared with those of competitors. Strategy Analytics also reports that, despite everything, many consumers remain the operating system iOS. This depends, however, often together with the purchased apps for the iPhone, and iPad. which one would have to purchase a new system change.
apple store lines

Despite problems with the iPhone 5, many customers choose to purchase

Apple was able to announce the launch of the latest smartphones not only positive headlines. Above all, the quality problems and the misstatements of the new maps app the IT group from Cupertino given the news regarding the iPhone 5. Nevertheless, this discourages the customer from not. Particularly in the U.S. customer loyalty is again significantly higher than in the countries of Western Europe, although these values ​​have fallen behind. Currently, 88 percent of Americans tend to have an iPhone. A year ago, the market researchers have reported 93 percent.

Monday, November 5, 2012

How To Make Your Own iPhone Ringtones

Bored with your iPhone ringtone that sounds-that's it? Want to replace it with "Bad Romance" Lady Gaga or her "Lambada" was Jennifer Lopez? In a normal mobile phone you can just replace mp3 ringtone with any song you like, but this does not apply to iPhone ringtone. You have to spend to buy a ringtone that you like on iTunes. This applies each time you want to change the ringtone even for the same song though. Whereas in the folder of your computer there are hundreds and even thousands of mp3 the cool-cool for a ringtone but can not be used on the iPhone. Or is there any way you can do that do not need to spend a lot of money to replace your iPhone ringtone?
how to create your own ringtone

Requirements

Actually, with a little creativity (not illegal or unlawful) then make mp3 to ringtone ringtone from your iPhone is not something that is impossible to do. Ok, first of all what you need
  • iTunes Application
  • Mac or PC computer used
  • Songs in the form of mp3 files that you want to use as ringtone

How To Make iPhone Ringtone

To change the mp3 songs into ringtones that can be played on your iPhone then follow the steps below:
  1. Run iTunes.
  2. Find in your library songs to be used as a ringtone.
  3. Play the song and find the part you want to use.
  4. Note the second start and second of the clip stops the song you want.
  5. Right click on the song and select "Get Info".
  6. Click the "Options" tab.
  7. Write a second start in the "Start Time", for example 2:01.
  8. Write also second stop in the "End Time". Verify that the ringtone does not exceed 40 seconds.
  9. Click "OK".
  10. Right click on the song and select "Create AAC Version". Wait until iTunes finishes convert your songs to AAC. When finished it will appear on your ringtone library.
  11. Right click on your new ringtone and select "Delete".
  12. Message will appear to confirm whether you would actually delete the file. Select "Remove" and then the "Keep Files".
  13. Find your files. If you are using Windows 7, use Windows Explorer and find your ringtone folder: Music> iTunes> iTunes Media> Music. Ringtone file you will be in a folder according to the singer's name. M4a file extension is.
  14. Change the file extension from m4a to m4r.
  15. Double-click the file that appears in your iTunes library.
  16. Now connect your iPhone and perform synchronization.
  17. Finished your iPhone ringtone

Well now you should have a ringtone that suits your taste buds to replace ringtone that maybe similaat with other people become your own ringtone creation. If you are having problems then you can leave your comments here. Good luck alone to make your iPhone ringtone!

Sunday, November 4, 2012

Photon Browser That Supports Flash on iPhone

Apple had long been at odds with Adobe that Apple no longer supports Flash on iPhone, iPod and iPad. With no flash supported on all of Apple gadgets then you can no longer play the Facebook game in the Safari browser and lost all the features of flash on a site that you see. For those of you who do not think much about Flash this may not be a major problem, but for me it is very annoying. Activity surfing on the internet I did through most of the Safari browser for example upload new photos to Facebook, view the latest news on mashable.com, joked with friends via social networking sites, and many other. Indeed, most of the social networking sites, like Facebook, for example, has issued its own apps for all devices using iOS operating system but still no Flash support on the iPhone is one thing that I feel less and make the gadget is a little short on value. Well for those of you who want to keep using the service now flash on the iPhone there is a solution that you can do. What is the solution? Read on this article.
photon browser flash support for iphone

Use Photon Browser to support Flash on the iPhone

After much searching in the iTunes store and got little direction from my friends, I finally found a browser that supports flash on the iPhone, iPad or iPod. The browser was named Photon . Applications are issued by AppsVerse full service support flash so that all web-based flash game on Facebook or you can run through a browser. Photon browser has two modes: normal mode to see the sites that do not use flash, and mode "lightning" to see the sites that use flash. It's a little like you as a user requires skill to actually be able to sort out which sites are using flash and which are not. Why is it important to remember? Yes, because before you decide to look at sites that use flash then you must press first the "lightning" in the upper right corner of the browser Photon. If you forget to press the button then all the flash services available on the site will not function properly.


How to Support the Service Photon Flash on the iPhone?

After I read all the explanations about the Photon on the site I found that Photon supports flash on the iPhone in a way to stream to the server. When you click on the "lightning" Photon browser is actually happening is that you log in to a server. On the server you will see the sites you visit on the browser with flash support services. Whatever you do on your iPhone screen will also be done on the server. Perhaps this is analogous to you to be remotely to other computers from your computer. For those of you who frequently use apps like LogMeIn, PC Anywhere and many others would be familiar with the term remote desktop.

In order to flash the Photon service can go smoothly so that you have an internet connection must be at least 3G and HSDPA. As information I have installed this app on my iPad and so far I am quite satisfied with the performance of flash has to offer. Photon Browser can be purchased at the iTunes Store at a price of $ 3.99 for the iPhone version and $ 4.99 for the iPad. So for those of you who wish to receive service support flash on iPhone, iPad or iPod you then it would not hurt you to try this app Photon Browser.

To buy the photon browser go here

Friday, November 2, 2012

How to Make iTunes Account Without a Credit Card

Yesterday one of the readers of this blog asked me how to create an iTunes account without a credit card. This is because when the reader was inquiring buy gadgets at the Apple reseller store, iTunes account used to register for the new gadget to iTunes account was not hers. All the gadgets Apple must be registered to iTunes when you first bought it. If you do not already have an iTunes account is legitimate to use another person's account for registering. But keep in mind that registration using iTunes account that is not yours can bring headaches later on. So my advice is before you buy Apple gadgets make your own iTunes account first. To make an iTunes account you only need one active email account. Credit card information is only required if you buy apps or songs on Tunes. Okay without further ado here's how to create an iTunes account without a credit card.

Make iTunes Account Without a Credit Card

Need I remind you that the tips that I will explain here is how to create itunes account without the need for credit card information through a computer / laptop that has been in the latest version of iTunes installed. Follow the steps below carefully so you can make an iTunes account without a credit card:

  1. Launch the iTunes application on your computer. Ensure that there is no iTunes accounts that are logged by choosing Store> Logout.
  2. Select iTunes Store in the menu on the left. Then choose one of the programs "FREE APPS" for purchase. Take great care that you have to choose is a no-cost program. The easiest way is to look at the right-hand menu and select the "FREE APPS".
    how to create itunes account
  3. For example I chose Google+ application that can be downloaded for free through the iTunes Store. Click on "Free App".
    create itunes account without credit card
  4. A window will appear asking you to enter your user name and password or create a new account. Select "Create New Account".
    how to create itunes account
  5. In the window that appears, select "Continue".
  6. In the next window check the option "I have read and agree to these terms and conditions." And click "Continue".
  7. Enter your email information, passwords, questions and answers you should write if you forget the password, and birth date. To make sure that the password is the password you select no less than 8 characters, contain at least one uppercase letter and contains numbers.
    itunes enter email addres
  8. In the next window you will be prompted to choose the method of payment you use. Select "None" and fill in the other information. Here, keep in mind the importance of choosing applications that include the "Free Apps" before creating a new account. If at the beginning we did not choose any of the "Free Apps" to download the payment option "None" does not appear. After filling in all the required information then click "Continue".
    itunes account create

  9. Window appears stating that an email has been sent to your email address containing a link to verify your email.
  10. The next step is to check your email. If you have correctly entered your email address then you should be getting a new email content is the same as in the picture. In the email also inserted a link you must click to verify your email address.
  11. After verifying it will display a confirmation that you have an iTunes account can be used.
    create itunes account finish

Advantages and Disadvantages Make iTunes Account Without a Credit Card

The advantage that you get from making an iTunes account without a credit card is certainly able to download all applications free alias paid. Without an iTunes account that you can not necessarily do. Lack of an iTunes account without having a credit card is that you can not buy paid apps. There are millions of applications for Apple gadgets in the iTunes store which I sold at a very low price but with excellent quality. So if you do not feel the need to buy paid apps then create an iTunes account without a credit card is an absolute need to do.
Safe Shopping Tips On iTunes / Appstore

If you are shopping for apps, songs, videos, etc. via iTunes or the App Store, then you need to read some tips on shopping safely on iTunes or the App Store like what On this article that I write. For those of you who do not already have an iTunes account, it can be read in advance tips how to create an iTunes account without a credit card that I've ever written before. Without a credit card, you can still shop at iTunes and the App Store, but only for apps, songs or videos that free. If you have a credit card then the credit card information you can add to your iTunes account to purchase apps, songs or videos paid. But the shop using a credit card via iTunes also must be done carefully so that the end of the month your bill is not swollen. In fact, some friends had a bad experience because of his iTunes account was hijacked by people who are not responsible. It is therefore safe shopping tips on iTunes / App Store that I write can be applied so that you will not hesitate anymore shopping.

Some Shopping Tips Safe on iTunes / App Store

What is the tips on shopping safely on iTunes / App Store that I mean? Well without wanting to make you wait any longer here are some tips that I normally apply:
  1. Always shop at the iTunes / App Store via your personal iPhone / iPad / iPod. To purchase applications, song or video you can do so via iTunes / App Store in your iPhone or computer you have. I prefer to shop directly through the iPhone than with a computer for several reasons. One is because the iPhone is that you personally have can only be accessed by your own computer while though privately owned, but did not rule out that others can access it.
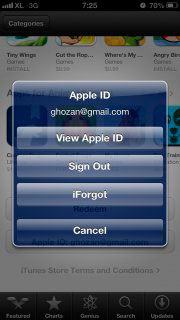
  2. Remove credit card information after you have finished shopping. Always remove your credit card information after shopping may, according to some people is a job that futile and a waste of time and energy. But this will make you more secure credit card bill at the beginning of the month and no swell. To delete your credit card information to follow the following steps:
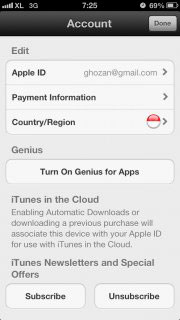
    App Store on your account and then select "View Apple ID".
    shopping tips on itunes

    Select "Payment information".
    shopping tips on appstore
  3. In the Payment Type select "None" then "Done". 

Safe Shopping Tips conclusions on iTunes / App Store

Shopping in iTunes is easy and fun, but you should always be alert to the dangers that lurk from people who are not responsible. Seoga by running a safe shopping tips that I write here can make you feel comfortable and no doubt in the shop.

Wednesday, October 31, 2012

Apple iTunes 11 Delayed - Development Needs More Time


A few weeks ago it was already announced that iTunes 11 would be completed in late October and available for download, now the backward roll. Apple spokesman Tom Neumayr as compared to CNET's now confirmed, the development of iTunes 11 takes longer than expected.

itunes11 preview

Itunes 11 Release is Delayed

Next start date when it will be released has now been postponed until the end of November. You want to do everything right and throw anything unfinished on the market, so in about the justification of Apple. At least one is confident Apple's iTunes and is looking forward to 11, a number of new features and a clean interface and seamless integration of iCloud will be the highlights.

"The new iTunes is taking longer than expected and we wanted to take a little extra time to get it right. We look forward to releasing this new version of iTunes with its dramatically simpler and cleaner interface, and seamless integration with iCloud before the end of November. "

Let us wait, still about four more weeks, we must wait. You can subcribe to us to get Up to date on this topic. And We will givwe the update news about this itunes 11 project and release..


Are You need help with your smartphone or tablet ? You like this news of more modern technology? Do you wish you share with other friend? Then visit our forum or look on our Facebook page

Monday, October 29, 2012

iMac New Model Will Be Available For Launch After Released

The new generation of desktop computer iMac was for iPad mini-keynote on the last Tuesday of the highlights of what is to be justified, especially with the ultra-thin design that many experts have positively surprised. If your presentation because you will soon opt for the new iMac generation, then we advise you to fast order as soon as possible, because the availability will be limited at the start of the launch.

During the conference call on the quarterly results from Apple CEO Tim Cook was asked if all the new products launched in the coming months would be available in sufficient quantity for customers. In his reply was referring to the successor of the late co-founder Steve Jobs specifically on the popular desktop computers and announced that the availability of the new iMac is limited to the market launch.

Tim Cook expects high demand

imac 2012 new model is available

Cook justified this by saying that the series would iMac are currently in transition. Thus, the older models are not currently available in the Apple Online Store. They may be sold only in the retail stores and from resellers. The new 21.5-inch iMac is first delivered in November, while the larger 27-inch model will not be sent out before December 2012, the customer. According to Apple CEO notice in a very high demand for the new iMac, which can be in the first few months apparently not satisfied.


Pre-orders are currently not available in the Apple Online Store. Be patient therefore a little and takes too quickly when the new iMac will be available in November and December. 


You need help with your smartphone, tablet or toaster? You like this news of more modern technology? Do you wish you share with other friends? Then please comment or follow me on Google plus

Saturday, October 27, 2012

How To Use iMessage On Apple Device

One of the flagship features of iOS 5 is iMessage, do you know how to use iMessage? Before we discuss about how to use iMessage is useful to know some important things that related to this feature. First, iMessage feature can only be found in the gadget that have been using iOS 5. iOS 5 is available for the iPhone from the iPhone 3GS, iPhone 4 and iPhone 4S. For iPad can be installed on iPad and iPad 2.
While the iPod is available for the iPod generation 3 and 4. So for those of you who have one of these gadgets can instantly upgrade your iOS to version 5 .

Second, iMessage feature very closely with your Apple ID. When you first upgrade iOS 5 then you will be prompted to enter your Apple ID to set up iCloud, iTunes Store, App Store and other features including iMessage. One thing I can conclude, after performing several experiments, is iMessage uses Apple ID as your identity. If you log in to the iTunes store on your iPhone using a different email address then iMessage feature will disappear instantly.

Third, contact on the iMessage depends on the contact that you store on your iCloud account. When you upgrade to iOS 5 and you choose to enable the feature iCloud you will be asked if you want to merge contacts on your iPhone with the contacts on iCloud. If you answered yes then all the contacts on the iPhone are copied to contacts in iCloud. If not then you have to put the contact by yourself in the iCloud contacts. Whichever way you choose iMessage will find a list of email contacts in iCloud and match the email address is also listed as an iCloud user. You can only send iMessage to your friend's email address listed on iCloud. Well apparently already too lengthy introduction, let us continue to discuss how to use iMessage.

Configure iMessage

Tutorial Use iMessage

There are several configurations you need to know before you can use iMessage feature:

  1. Go to Settings> Message.
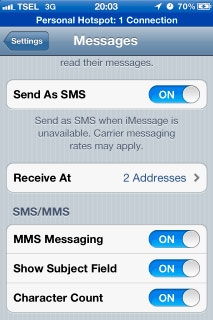
  2. On display will be seen a number of configurations that you can adjust as needed. iMessage course must be in a state of "ON". "Send Read Receipts" is useful to send someone a message receipt so you have read. "Send As SMS" is an option to send the message as SMS when iMessage is unavailable. "MMS Messaging" to turn on MMS option. "Show Subject Field" to show the "Subject" at the time you send the message. "Character Count" to show the number of characters you have typed.
    how to use imessage
  3. tutorial use i message
  4. There is one option that is "Receive At" that must be considered. Within these options there are a few more things that can be configured. At the very top you can see the Apple ID used by iMessage. Make sure that the Apple ID is the same as that used on your iCloud account. Your message can be received in two places, namely mobile phone number and email.
    how to configure imessage
  5. Well now after all finished settings configured let's try using iMessage. Select the icon "Messages" on your iPhone. Type the name of one of your friends who also have the iCloud account. In the picture below we can see that my friend has a phone number and email. If the email is listed on iCloud then the right will see a blue bubble that indicates that you can send iMessage to that email address. "Send" button on the screen as well as sending a message reply from your friends will also be a blue background. SMS usual background color is green.
    try use i message

Conclusion

iMessage is certainly a feature highly anticipated by users of Apple gadgets. With this feature you can send messages to your friends iPad or iPod free of charge as long as you have an internet connection. How to use iMessage is also very easy as I have written above, it may be useful.

Sunday, October 21, 2012

Apple Prepare Cheap iPhone Offers Against Android

Emerging issues that Apple is preparing a cheaper and contract free iPhone to combat Android-based mobile prepaid. As quoted from the Boy Genius Report, Apple said to be preparing to launch a prepaid iPhone 3GS sold in the $ 350 price range. If $ 1 valued approximately Rp. 8500 the iPhone has become the cheapest iPhone at a price of approximately Rp. 2.975 million. We can Say that the price is Cheap isn't it? Compare this with iPhone bundled with local operators termurahnya prices that reached 6 million. Of course if this is true then certainly welcome consumers will be enormous. Consumers no longer need to be bound to a contract to get a cheap iPhone. Previous Apple also been doing the same thing that is selling a cheaper version of the iPhone last model. With the cheapening of the price of the iPhone 3GS Apple trying to segment their customers: the top level with the latest version of the iPhone, the iPhone 4 mid-level and lower level with his iPhone 3GS.
apple offer cheap iphone

Apple's strategy with the iPhone Offers
Apple already showed how aggressive they were with the price of the iPhone 3GS: iPhone 3GS in January 2011 bundled with a two-year contract with AT & T only sells for $ 49. By selling the iPhone 3GS without a contract at $ 350 then Apple will provide access to the prepaid market is currently dominated by Android with Samsung Intercept work with Virgin Mobile ($ 250) and LG Thrive with AT & T ($ 179). Prepaid cell phone without a contract market is being stretched because of the many advantages perceived by consumers. First, in the absence of a contract with the operator then consumers will be able to freely determine the operator wants. Suppose today we use the operator A later realized that the service was not good because the signal is often lost it right then we can replace the operator B. Second, after-sales service for mobile phones without contracts easier than selling the phone is still under contract with the operator.


Certainty of Cheap iPhone Issues

As usual the issue is still a cheaper iPhone speculation that might not be true. However, this issue has also been reported by the New York Times, Bloomberg and the Wall Street Journal in February. If these three famous newspaper dared to ask this issue to be one of the main topics of this issue then it is likely to be a huge reality. But the issue is not necessarily a concern of cellular operators because they are more than happy to tie us to a contract in the future. And if you take it then I guess you'd prefer to pay a little up front to get the better stuff. With so cheap iPhone issue is likely only be a distraction to you while waiting for the new output of the Apple iPhone.

Friday, October 19, 2012

How to Syncronize Contacts via iTunes

Are You Move to A New Gadget ?


Usually if you buy a new gadget, whether it's iPhone, iPad, or iPod, then move or syncronize your exsiting contact book becomes very important. How do you run your business if all your business contacts are still left in the old gadgets? Or how you can call or contacting to your friends or colleagues if their phone number is still there in the old gadgets? For thousands of reasons then move your contacts book to a new gadget that should be implemented as soon as possible. But did you know how to move a contact book that could be a hundred or even a thousand contacts? Are you going to do it one by one? Move it one by one can take a long time and when you're done you've wanted to move to a newer gadget again.

So what should you do? The answer is very simple. Synchronize your contacts in an old gadget with Microsoft Outlook. step or the tutorial on how you can synchronize your contacts with Outlook old gadget will not be discussed here. You can look it up in the search engines such as Google , Bing , Yahoo and others. Because in this tutorial i only show how to sync it after you have sync your contact to microsoft outlook. Well after moving contacts in Outlook then comfortably live next move to the iPhone, iPad or iPod. To achieve this goal you once again have to deal with iTunes. You don't need to worry with this tutorial because this tutorial don't risks your apple gadget, beacuse this don't make change to your phone system.

Here are the steps that must be done to move your contacts to your iPhone / iPad / iPod:

How To Sync Contact Books


  1. As usual launch iTunes on your computer
    how to sync contact book
  2. If your gadget is connected to iTunes then you have to do is:
    syncronize outlook to itunes
  3. Explanation from the image above:
    Click the contact info for the move.
    Check "Sync Contacts with".
    Select "Outlook".
    Click "Apply" to start moving contacts.
Finish. it is quite simple right? so you can easily transfer your existing contact on you old gadget ( ipad, iphone or ipod). Ok thats it for today, se you next time